Page Links

Friday, July 29, 2011

Canvas Obsession

Finished Canvas
I am obsessed with canvases! If I walk into a craft or art store and they are on sale I have.to.buy.it! It's a compulsion that I am {sort of} working on. Am I alone in this obsession-compulsive behavior? 


I have found that you can make so many cool things with a blank canvas, that far outreaches just painting some pretty art. Here are just a few things that I have made with a blank canvas: Ribbon/barrette holder for my babies room, guest book, baby book {this one is in the making}, and lots of other "stuff". I always have at least one canvas hanging around in my house just waiting to be used. 


Awhile back I pinned this little beauty on my pinterest board. I knew I wanted to do something similar to it for Sophia's upcoming birthday. So, yesterday while my little darling took a nap, I decided that now was as good of a time as any to get started on making the canvas for her. 


Items you need:
{one} Blank Canvas
{two} Craft Paint
{three} Pencil
{four} Crepe Paper Streamers
{five} Hot glue


I started by drawing free hand zebra stripes on the canvas with a pencil. Then I took some hot pink craft paint and with a small, flat brush painted the stripes on {well actually I painted the not-stripe part.... you know so the stripes looked white and the rest was pink.... but I digress}. 


Once the paint dried, I drew on a big number one. I tried to fill as much of the canvas space as possible. 


Then I broke out some black crepe paper streamers {I got 2 rolls for $1 at dollar store}. I folded the crepe paper over a few times and cut out some four-petal flowers {I did this by folding my crepe paper squares in half one way and then in half the other way}. Word to the wise... you will need LOTS of these little flowers, so cut out a bunch at once by stacking crepe squares on top of each other before folding and cutting. Otherwise you will be cutting for a long time. 


Once the flowers were cut out, I took the flat end of a wooden skewer and twisted the middle of my flower around it, dabbed a little hot glue on the end and put it down on my canvas. I found that it worked best to go around the outer line of the one first and then to go in a fill in the holes at the end. 


Lastly I took some of the crepe paper, and hot glued it around the edge of the canvas to finish it off.


I have not decided exactly where I am going to put this for her party yet. My ideas right now is to either add a ribbon and hang it on the front door like a wreath to greet her party guests, or on a little easel somewhere. Either way I am totally in love with it and can't wait to get to craftin' more cute things for my baby's party!


I linked up to the Pintrest Challenge! Check out all the amazing projects inspired by Pinterest herehere, here, and here.

Wednesday, July 27, 2011

Oh Baby! Bedding

I told my friend Patti that I would help her sew some crib bedding for her baby boy, Everett {even though I, myself, have never actually sewed crib bedding... ever}. A few weeks ago she came over and we did the fitted sheet, which was so surprising easily! So, when I headed over to her house the other day to sew the crib skirt and blanket, I was going into it thinking, "piece of cake, this won't take long". Fast forward 6 hours later and my tune had changed quite a bit. Oh.my.word! Sewing stuff like that is a time consuming and tricky little endeavor. I had high hopes for doing this cute little tutorial on how to do it, but about 5 minutes into the project I realized that this was not something I was ready to take on. So, I decided to keep the sewing tutorials to the "professionals" {for now anyway}. 


Here is the tutorial we used for the crib skirt, the blanket, and the crib sheet {we made a few modifications to fit our needs but in an effort to keep this post simple I am not going to include those...)


I will leave you with a few tips {also known as stuff I wish I would have known/thought through BEFORE starting this project}:


{one} Unless you are an expert sewer, don't use a accent color as your thread choice {unless you want every.single.mistake you make on display for all to see... from across the room}


{two} If your sewing machine is not working correctly check to make sure that everything is threaded correctly FIRST {don't start taking apart the whole machine, only to realize your thread was not on correctly.... and then only to realize you are not quite sure how to put the machine back together}


{three} Measure two {or three or four} times before you cut your fabric...


{four} Have fun and don't take it all so seriously! Sewing is supposed to be fun. So grab a friend and some good music and have at it. It's not supposed to be perfect, it's handmade {and rustic}


{five} You are your own worst critic. No one will most likely notice the crazy "Z" you made when you were sewing, so don't point it out everyone that comes over (that one was for you Patti). 


HAPPY SEWING!

Tuesday, July 26, 2011

Fun bird tray

Here is a fun little tray that ended up fitting in perfectly in my kitchen.

Supplies:
Frame with glass
Caulk
Craft Paint
Varnish (optional)
Enough fabric or paper to fit frame


*how do you like that powdered coffee creamer that is poofed everywhere? Nice huh? ;)


I happened to have this frame in the closet, so I removed the glass and painted away. I set it out to dry and then sprayed it with a varnish so it would be easier to wipe down after being used.


Then I added a bit of fabric and caulked around the inside (not as neatly as I would have liked, but it adds to the charm, right?). Here is a helpful tip that I didn't think about. At this point, don't pick it up. It squishes the caulk out and then you get to redo it (hence the non-neatness). Just let it sit and dry overnight.


Add your sweeteners, creamers etc and you are good to go! Enjoy!

Monday, July 25, 2011

52 Weeks: A Labor of Love


One of the craftiest projects that I have ever done was make a baby... I mean I worked on that sucker for 9 whole months.


When I was pregnant I stumbled upon an idea from Young House Love. They were taking a weekly picture of their daughter for the first year to chart her growth {and because it is so darn cute}. When I saw this idea I thought, "I can totally do that!" "The hubs could totally do that!" I showed him the idea and he was all for it. 


Now, let's take a side bar for just a second and say that we are the King and Queen of starting photo projects and never finishing them, so when this idea was born {pun fully intended}, I never thought that we would actually follow through. However, we are going strong with our daughter being 10 1/2 months {how did she become that old} and we have not missed a week yet {though we have come super close}. I guess becoming parents has made us more responsible!


Here are just a few of our weekly photos! To see more click here.


From day week one everyone that has seen her weekly photos have always asked us 3 questions:
1. Where did you get all the onesies? (Answer: It is just a simple white onesie used over, and over, and over again, with a little photoshop magic worked in)
2. Isn't that a lot of work? (Answer: Yes and No. The hard part is just remembering to do it. Once the picture is taken it can sit in our camera for a bit till we have time to photoshop it.)
3. Where do you get all the blankets? (Answer: We beg, borrow and steal! The people over at Young House Love buy a yard of fabric every week, but their job is their blog and doing DIY stuff. We knew going into this project that we could not afford to buy fabric every week solely for the sake of a picture {and because if I was being honest, I knew I would never do anything with the fabric and I am way too cheap money conscious to do that}. Luckily for us we have lots of blankets with fun patterns, and we had quite a few different fabrics from my sewing collection to start us out. After we did a few weeks our friends and family got excited about the project and started bringing their blankets and fabric over for us to use. However, we could only ride that train for so long and right at the 10 month place we totally ran out of material to put her on. We threw around the idea of just biting the bullet and going to buy some discounted fabric for the last 8 weeks, but James had a brilliant idea: if we are able to photoshop a design onto a white onesie, why can't we photoshop a design onto a white sheet. So we tried it and it worked really well {I am trying to get James to write a tutorial on how he did this for his blog, once he does I will link it up}. I would not recommend doing this for every week, because it would get a little labor intensive, but it works great when you are in a pinch!

Original Photo
Finished product!
Once those three questions are asked, people instantly ask me to teach them how to do it... so that is what I am going to do {and by I, I mean I am going to link you over to YHL's tutorial that they wrote, because they did an amazing job teaching us how to do it, so I figure they can teach you as well!}


Click on the link for a full tutorial of how to do your own 52 week project
Give hey sis a little love: If you click on the link, leave a comment on their blog post letting them you know you found them through us!


The beauty of this project is that it was totally FREE! Ahhh.... how I love free!

Saturday, July 23, 2011

Cloth Napkin Table Runner

Yesterday I decided that I needed a little craft therapy, so I whipped this little cutie up in about half an hour...


I found these cloth napkins at Michael's last summer. They were in the dollar area, but I waited long enough to buy them and they were marked down to a dime each!


All I did was a quick stitch with embroidery thread and tied a knot at every point that they overlapped. I did this by hand, but it would work just fine to do it on a machine. I was going for a bit more "homey" look so I wanted the knots showing.


This is just one of my favorite things in my house. It is a trifle bowl that normally collects dust in my cabinet, filled with faux moss covered rocks (I needed 3 bags from the Dollar Tree to fill it). The flower is just 2 stickers on either side of a toothpick. The cow was covering the sip hole on my to-go coffee cup. The letters (which represent mine and my husbands initials) are from some happy birthday candles (also from the Dollar Tree... seeing a trend?). Cute huh?!

Friday, July 22, 2011

Brought to you by the letter "P"

I actually made this monogram wreath awhile back and am thinking of changing it. However, before I did I thought I would walk you all through a quick step-by-step of how I did it. The beauty of this wreath is it was easy and cheap so I don't feel bad changing it up all the time, because it was not like I spent a fortune. And also I don't have room for tons of different wreaths {maybe someday I will}, so having this cute "P" that I can change the look of whenever is a win-win for me!


I bought this letter P over a year ago at Jo-Ann's. It was 50% off because it was a little scratched up but that did not matter to me because I knew I was going to cover it anyway. I paid less than $5 for it {not sure exactly how much, but I remember it was a good deal}. The letter is one of the paper mache letters, not the wood kind, which I like better because they tend to have crisper lines and be a bit more simple in shape {which I like... but it's a preference people}.


I had originally bought it to use during Christmas. I wrapped it tightly in green garland and added some iridescent orange and pearl berries to hang in my living room. It served me well for two Christmas' but then I got bored of it {as I do with most things in my house}. So in February of this year I revived it into something spring-y! 


Here is what I did:
If you are a librarian please avert your eyes for a moment... 
1. Found an old book lying around the house and I ripped {gasp} out a bunch of pages. 
2. I used my handy dandy paper cutter and cut strips of paper. 
3. Then I had to make the decision of how I wanted the paper to look. I tossed around two ideas: I could either just to throw the paper strips in all different directions for a more "rustic, wind blown look", or have all the strips going in the same direction for a more uniform look. I choose to go with the second idea because the thought of the words being chaotic quite frankly stressed me out. 
4. I mixed up some poor mans mod podge (Elmer's glue diluted with a bit of warm water), and started sticking my strips of paper on. 
5. Once I had the letter completely covered I went around the edge with more strips to make it look a bit more finished and then gave the whole things a quick once over with more of my glue mixture to really seal it up. 
6. Next I made my birds simply by cutting out a simple bird shape and two simple wing shapes from leftover book pages and some craft paper I had on hand. I glued a wing to each side of the bird and added a rhinestone eye for a little bling!
7. I made the flower by cutting out three different petal shapes (large, medium, and small). Once they were cut out I just started glueing them on top of each other in a circle, till I got the desired fullness. Then I took a wooden skewer and wrapped the ends of the petals around it, to give the petals a little curl on the ends. Lastly I added a bunch of sparkly beads to the center of the flower by using the very precise glue and dump method! {I did not use this exact tutorial but it was similar to this... I obviously tweaked mine quite a bit but this is a good place to get a visual of what I am talking about}
8. Lastly I played around with where I wanted my birds and flowers. Once I liked were I had them I hot glued them in place. 


Happy Wreathing!


Thursday, July 21, 2011

Oh Yum!

One of my most favorite blogs in all of Blogland is Crafterhours, a few days ago, Susan posted a recipe that she found for Oreo stuffed chocolate chip cookies. One word guys.... YUM!!! Check it out, make them and come back and tell me how decadent and fantastic they are. Not anywhere near low-cal, but the hubs made them for me for my birthday treat and I wanted to shout from the rooftop about how delish they were! Thank you Susan!!! Enjoy...

Wednesday, July 20, 2011

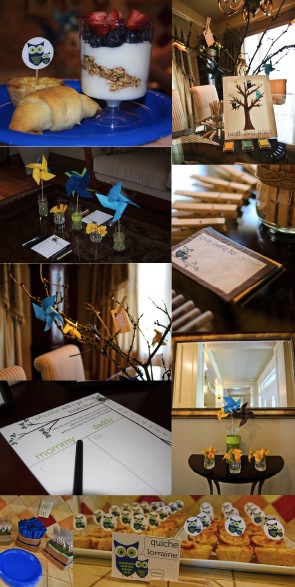
Baby Shower- Owls & Pinwheels Printables/Cost

I'm back with a cost breakdown of the decorations for the owl & pinwheels shower as well as a few free printables that you are more than welcome to use. 
*If you are interested in personalizing any of the printables let me know and I can do that for you. 


Free Printables:
Owl Circles- This is what I used to make the toothpick toppers for the quiches. Click here for example.
Love Note- I printed these out on sticker paper and attached them to cardstock
Food Cards- These are what I used in front of the different types of food. To get them to stand up I used clothespins as a base. Click here for example
Baby Looks Like- I had the mommy-to-be bring a baby picture of herself and her hubs and people voted who they thought the baby would look like. Click here for example. 
Predictions- This was in place of a game. I gave each guest one of these to fill out while the gifts were being open. 
Owl on Branches- Feel free to use this to enhance your own printables!
Just OwlFeel free to use this to enhance your own printables!
Just BranchFeel free to use this to enhance your own printables!


Cost Breakdown for Decorations:
Branches (for love note tree)- FREE! 
Vases & Mason Jars (used these for the tree, pinwheels, and flowers)- FREE!


Marbles (used in vase for tree)- FREE!
Clothespins (for attaching love notes)- $1- got at dollar tree
Paper Bags- FREE!- I had a bunch laying around in my kitchen… but I you can pick some up at the dollar store
Cardstock (for bunting & pinwheels)- $6- I got this at Michaels, on sale 6 for $2 plus I had a 20% off entire purchase- woot woot!
Thread (for bunting)- FREE!- already had some on hand.
Ribbon- $7.99- I bought 6 different types of ribbon on sale at Michaels, and I had lots leftover for other projects.
Yarn (used this to wrap around vases and for bunting)- $1.99
Twine (used this to wrap around vases for a rustic look)- $1.99
Canvas- $3.99- got this at Michaels on sale
Paint (for canvas)- $1
Pen (for canvas)- $1
Ink Pads- $2.50- I got three colors for people to use for their prints
Owls (used on bunting & canvas)- FREE!
Dowels- $1 for 50- and I have TONS leftover for another project.
Beads (used on pinwheels)- $2.99- I had lots of beads leftover too… and they are really nice glass beads. SCORE!
Peas (used this as filler for EVERYTHING)- $4- I bought this in bulk at Winco

Grand Total- $35.45


Tuesday, July 19, 2011

Got cassette tapes?!

Okay kids... know that stash of cassette tapes that you have on the top shelf of your closet? Well go grab them! All this project requires is 10 cassette tapes (my friend gave me hers, but I have seen them at the thrift stores for $0.25!), glue (hot glue or E6000, hot glue is quicker, E6000 is stronger) and a small bit of craft foam-if desired.


I made two of these a few years back. One for little pads of paper and one for pens. I found that pens tended to get stuck in the little holes on the tapes, so I glued a bit of craft foam in there.


You get the idea of how they are glued together from this pic. I glued the sides together first then stuck the bottom on.


And here they are where they live on our little desk. Helps keep things nice and tidy and is fun and a little retro :) there you have it... a super fast project for ya! Enjoy!!

ps... sorry about the poor picture quality... these are from my little point and shoot :)

Monday, July 18, 2011

Baby Shower- Owls & Pinwheels Decorations

So I am back to talk about the Owl & Pinwheel shower decorations. Everything that we made was super easy but some were a little more time consuming then I had anticipated. However it was all TOTALLY worth it in the end! I am about to spew a lot at you so go and grab a cup of coffee and get cozy… it’s ok I’ll wait…
////////////////////////////////////////////////////////////////////////////////////////
OK, are you ready? Let’s get started!

Pinwheels:
To make our pinwheels I used this tutorial but modified. I did not really care if the pinwheels spun around or not. So I just did the first part of the tutorial without adding the pin to make it spin. 

Here are a few things that I learned in this process that I wish I knew BEFORE I started making the pinwheels:

{one} Thicker is NOT better- When I bought the paper for the party I got really nice and thick cardstock, however when making pinwheels you want a lighter weight cardstock. The paper we used for the pinwheels was so thick I wanted to scream (ok… lets be honest I may have actually screamed a few times). Since the cardstock was so thick I had to use more hot glue then I would have liked, fortunately I had a bunch of super cute beads that I could put in the middle to hide this little problem.
{two} Hot Glue is…. HOT- Ok, so I realize that this is a “no duh” statement but when hot gluing a precise (read: small) area it is best to have a little dowel to hold the paper down as opposed to your finger. Pretty sure I completely burned my fingerprints straight off before I finally wised up and started using a dowel. Hey I never claimed to be smart, just crafty!

Canvas:
I have been seeing the idea of using a canvas as a guest book for a wedding floating around the internet for awhile now and I have just been itching to throw some sort of party that would warrant me doing one. Once the theme was set for the shower I knew that this was something that I had to do for the party! Making the canvas was super easy!

{one} I started by drawing a picture of a tree on a piece of paper, cutting it out and stenciling it on the canvas (I am sure I could have just drawn the tree directly on the canvas but I was not sure how well the pencil would erase from the canvas if I made a mistake and I am not that confident in my drawing ability)
{two} Paint the tree in desired color (I found it best to paint the outline first with a thin brush and then go back and fill in)
{three} Let dry!
{four} I had some of the material that Everett’s nursery is being done in so I got out my super sharp sewing scissors and very carefully cut out three little owls from the material. (I also tossed around the idea of making a simple owl out of paper and sticking it on, but I loved the fact that when the canvas was done it would exactly match his room)
{five} To adhere the owls I used some liquid fabric starch and water. I decided to do this versus mod podge for a few reasons: (1)If I did not like were the owl was placed I could simply peel it off wipe down the canvas and stick him on somewhere else. (2) If Patti decided that she did not want to hang it in his room but somewhere else, she could peel the owls off and add something else (or leave it plain) and no one would know!
{six} Lastly I used a fine tip permanent pen to write Everett’s name on the canvas, and viola!

I thought that this project was going to be the most difficult to pull off and it was the easiest and took hardly any time at all!

Bunting
I got the inspiration for the paper bag bunting from here
I did mine a bit different then the tutorial said. For one, I did not use material but paper that matched the pinwheels. I also did not cut any of the bag off. I used the extra amount of paper on the bag to fold over and sew across of to create a loop for the yarn to go through. I also kept mine a bit simpler than the tutorial is for. I knew Patti would end up using it in Everett’s nursery and I wanted to keep it sweet and simple so it would easily be incorporated into his room.
Also, sadly I do not have a silhoutte, so I printed out the letters I needed off my computer and had a friend (thanks Vanessa) cut the letters out, trace them onto the cardstock and then cut those out. This made a project that should have taken less then an hour take…. Ummmm… well lets just say it was a lot longer than an hour.
After making the bunting with Everett’s name, we also made ones that said food and gifts.


“Love Note” Tree:


I had an idea to keep with the tree theme of the canvas to make a “tree” for people to hang love notes on to Baby Everett. So easy and cute!

Literally all I did was send the hubs out to cut down some branches. Then I threw a bunch of decorative marbles into a big vase, wrapped the vase with the leftover yarn from the bunting and popped the branches into place. 

For the love notes, I took the scraps of cardstock I had left, cut them to 4X2½ inch pieces, and printed out on sticker paper something that said “love note to Everett” with a little owl on the bottom.

When people came to the shower they wrote a note and put it up on the tree with a clothespin.


There were tons of other things that were added to the party for little to no money, but those are the main things. {did I overload you?}

I will be back later this week to give you some free printables I used for the party!

"create" wreath

So this was a super simple {and way in-expensive}craft! It turned out super cute and it greets me every time I enter my craft room.


I started with a simple styrofoam wreath {I picked this up at the Dollar Tree} and slapped some paint on it. Easy enough, yes? 


Then I added a little bird { also found at the Dollar Tree, she even has a little friend that I have sitting in my kitchen}, some flower stickers and a ribbon scrap as a banner with some chipboard letters {found those at Target in the Dollar Spot for 75% off!} and VIOLA! super duper cuteness to greet me!


Sunday, July 17, 2011

Baby Shower- Owls & Pinwheels


Patti & her daughter in front of the gift table!
Last weekend I had the privilege of throwing a baby shower for a dear friend, Patti, and her soon-to-be baby boy, Everett.


Everett's nursery is going to be owls, so I used the owl pattern and colors of his room as inspiration for the shower.


Here is a little sneak peak of the baby shower. I will be back later this week with some tutorials of the decorations that my friend Vanessa and I made (this includes the guest book canvas, pinwheels, bunting, games, love note tree, and so much more).


Spoiler Alert: I spent $35 on ALL the decorations (not counting food, I had other ladies that made some tasty food for the brunch, so that did not set me back anything). Let me just say, the shower was so cute and looked like it cost a lot more than $35.

Welcome to hey sis!

What's "hey sis"?
Hey sis! was created by Alisa & Rachelle who are not actually sisters but cousins. However, growing up we called each other sister... because lets face it calling someone "sister" is so much cuter then calling someone "cousin". While we live in separate states there was something that always bonded us (other than the whole being related thing), and that was our love for all things crafty, creative, and just plain pretty! After years of spending time doing lots of creative "stuff" apart {occasionally together when we happened to be visiting the other one}, we decided to join creative forces to create "hey sis!". 

Our projects may not always be 100% original, but we will try to give credit to wherever we found our inspiration (and hope that if you find yourself inspired by us, you will do the same). 

We hope that this will be a place that we can share projects with each other, because lets be honest living in separate states does not always give us the luxury of knowing what amazing projects the other is spouting out. However we also hope to inspire our readers (even those who think that they are not "creative enough" to be crafty) and in turn be inspired. 

We are looking forward to taking over the world one glue stick at a time!

About Alisa
Alisa is a 37 year old (gasp) mom of 6 (yep, six!) ranging in age from 8-18. Needless to say, going to an official "job" is not realistic, so instead she decided to take on another form of work and is now playing nanny-of-sorts to her brand new little niece! Before your little heart skips another beat from hearing how many kiddos are in this house, keep in mind that our family is blended, so they kinda revolve in and out... but mostly in :) Alisa has always been crafty  teaching her friends how to color with crayons perfectly and making dolls out of panty hose and the like from as far back as she can remember. Now she enjoys using these skills to decorate her home and help entertain her kiddos!

About Rachelle
Rachelle is a 20-something part-time Pre-K teacher and full-time mom to a beautiful little girl. Growing up she always loved to be creative, but never thought that she was one of those crafty people till she graduated college, got married and realized how expensive everything really was. She started to get crafty out of a love for pretty things and a hatred for things that cost money! She now proudly calls herself a frugal {read:won't pay for something that she could figure out how to make herself} and creative gal!