Page Links

Showing posts with label girl. Show all posts

Wednesday, September 14, 2011

Birthday Party: Zebra {with a touch of poodle}

 Sophia's party was so much fun and we were so fortunate to be able to celebrate her special day with our amazing family and friends. We are so blessed to have each and everyone of them in our lives. Our daughter does not lack in the love department... she has so many people who love her so much!
Remember those coffee filter pom-poms? Well they made an appearance at her party in the form or table decorations!
 I threw around the idea of putting her canvas on the front door, but decided instead to use it to decorate the gift table. I used a easel to stand it up and tossed a few pom-pom balls around it for good measure.
 I took the wire grate off of an old gate that was on our side yard and used it above the outdoor fireplace at my parent's house to hang all of Sophia's weekly pictures (not going to lie... so glad that little project is done and over with).
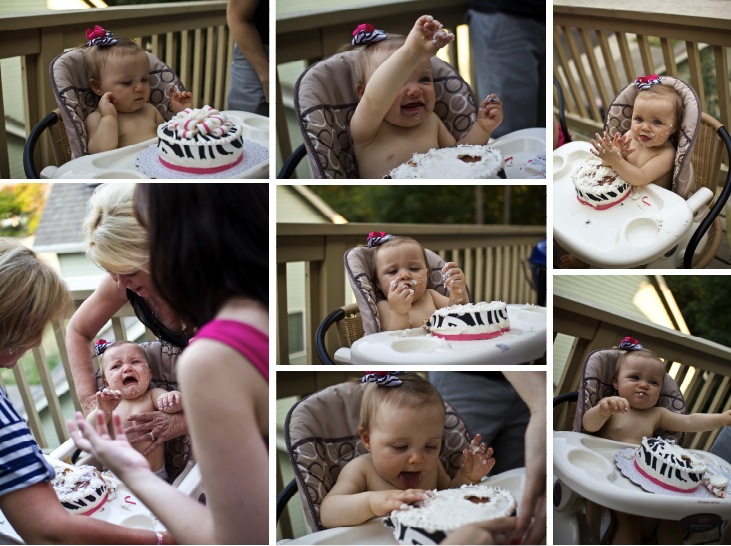
 Less than a week before her party I still had no idea what I was going to do for a smash cake. I wanted something to match her party, but I was not finding anything I liked. So I enlisted the help of my mother-in-law who enjoys cake decorating and she made this for her. Isn't it so cute?!?!
I did a sweets table outside also. I hung all the ruffled streamers and put up a zebra stripped "sweets" sign. On the sweets table I put out zebra cupcake liners that had ice cream scooped inside, chocolate dipped pretzel rods, as well as some cupcakes in {baby food} jars. Next to this table I had a decorating station where people could pop the lid off of their cupcake and decorate them with frosting and sprinkles!

I created lots of printables that matched her theme. I created cards for the food tables, stickers that I used on the cupcake jars, and note cards that said remember when for our guests to write their favorite Sophia memory. Of course there was also LOTS of pictures all over the place of her first year. 


We decided to wait to let her have any cake till her party. So her little mouth had never tasted the goodness that is frosting! It was so fun to watch her reaction and to see her dig in for the first time. As you can see by the bottom picture on the left she was not too happy when cake time was over!


Lastly, her birthday outfit is the one thing that I did not create myself (well, and the smash cake). I actually got the entire outfit custom made (the tu-tu, embroidered onesie and bows) on etsy from a shop called tutu2cute. She did an amazing job, got it to me quickly and customized perfectly everything I asked for. 


Monday, August 29, 2011

Organization Week: Hair Accessories


I am a big fan of baby bows... I mean a B.I.G fan! I don't even think that Sophia was a few hours old when I slapped her first bow in her hair. I always had this fear that people would think she was a boy {which still happens even with a big ol' bow in hair... go figure}. I just think bows are so pretty and cute and well, I just love them. The only problem with bows is they are so easy to misplace. I learned pretty early on that if I was going to support my bow buying/making habit, I needed to figure out a way that I could organize them easily and for cheap {I mean, I had to do it for cheap so I could buy more bows}. 

I made two different places to organize hair bows in my daughters room. The first place was to organize her clips, and the second place was to organize her headbands. This is nothing ground braking, people! I used many tried and true methods but with my own spin on it.

Hair Bow Holder:
{items needed}:
~ old canvas {even a piece of sturdy cardboard/old frame/piece of wood would work}
~ material 
~ ribbon
~ staple gun
I usually have way more bows up than this, but this picture was taken on a "bad" organizing week. Do as I say, not as I do people!

{what I did}:
The process is so easy that I don't think it even warrants a step-by-step explanation. All I did was take an old canvas {side story behind the canvas: I decided to make some beautiful art work for my hubs office... well lets just say two hours later all I had to show for it was a canvas that looked like... ummm something brown and nasty was smeared all over it. Not my most shining artistic moment}.
I took some leftover fabric from her crib bedding that my mom helped me make and pulled it taught and straight and stapled it to the back using a staple gun. Then I added coordinating ribbon by stapling it down the canvas vertically. Lastly, I added a piece of ribbon to the top and hung it up next to her changing table. 

Headband Organizer:
{items needed}:
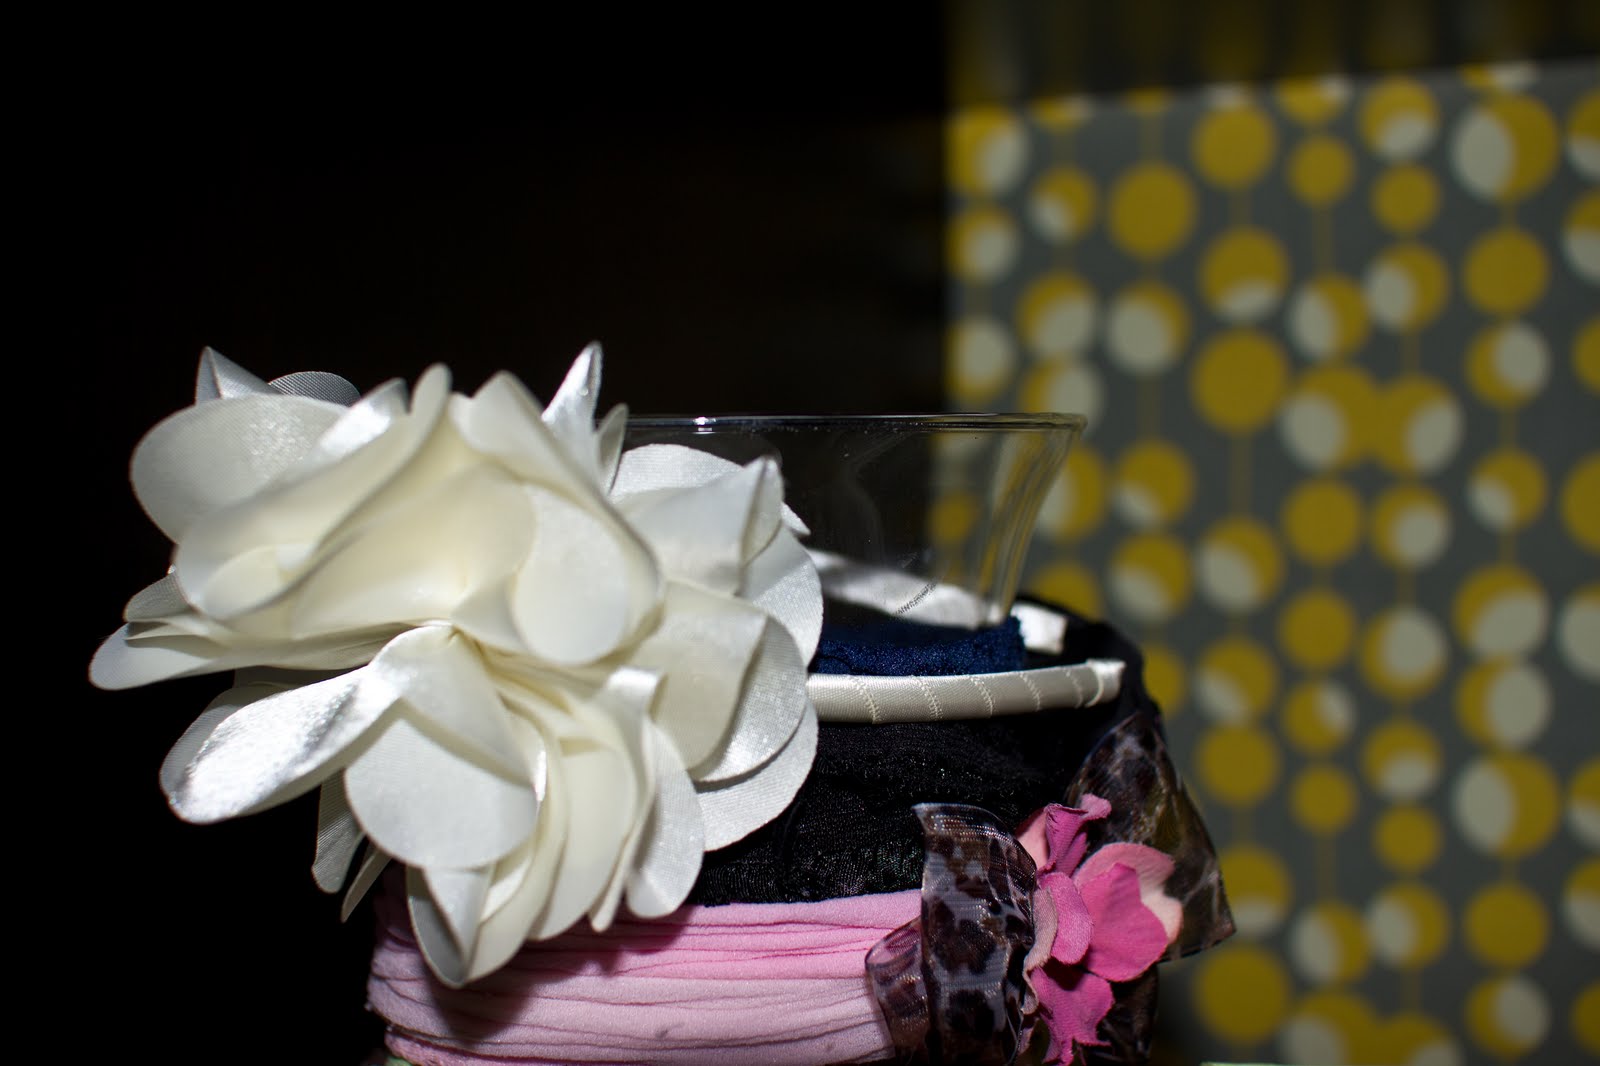
~ Round vase {about the same size round as an oatmeal container}--- I got mine at the dollar store awhile back
~ NOTHING ELSE!
{what I did}:
I took headbands and put them around a vase. That's it! I threw around the idea of making a headband holder out of an old oatmeal container, but that would have required some decorating of said oatmeal container and I did not have anything on hand that matched her room. 
And guess what? Once I added all of her head bands you wouldn't have even been able to see the decorating anyway. So I say the glass vase solution was a win!

So there you have it! That is how I keep my love for baby hair accessories under wrap. Simple, easy, and organized!

Friday, August 19, 2011

zebra tray {diy style}

My daughter is turning one in about 3 weeks, and I have been trying to do a little here and there to keep myself for feeling overwhelmed right before the party. I knew a few months back that I wanted to use zebra print and hot pink in her party {with a little flair of poodle... I know that sounds strange but I promise it will be so cute... just you wait}. 


I started searching a few weeks back for some cute zebra print serving trays. Here are a few that I found that I loved...
"More than Paper" Zebra Tray- $40

M & N's Custom Monogrammed Gifts- $42

Haiti Gallery Art & Home Decor- $24.95
Any of these trays would have been a perfect fit for the party, the only problem was the price. I am working with a pretty tight budget for this party, and I could in no way justify spending that much on something that was going to be used for one party {I am sure I would reuse it for other special occasions, but not that often}. 


So, I decided to create my own zebra tray{s} and they turned out perfect for what I needed. It took me about 30 minutes to make both trays and it required no glueing, no sewing, and no clean-up! 


{what you need}:
~cookie tray {I picked up 2 at the dollar store}- $2
~ zebra print duct tape {I got mine at Michaels with a 40% off coupon}- $2.99
GRAND TOTAL {for both trays}- $4.99


Disclaimer: I did not take pictures of the process... in fact the tray in the above picture is one of my old cookie trays, hence the reason it looks a bit *ahem* loved. I will try to explain the process the best that I can.


{here's what I did}:
{one} cut 4 small strips of duct tape and attach them to your four corners {this is important because it creates a buffer, in case all your corners don't line up perfectly}
{two} cut and stick long strips down on the top of your tray, going slightly up on the walls of your tray. 
{three} cut strips of duct tape the length {plus a little wiggle room} of the four sides of you tray. 
{four} doing one side at a time cover the four walls of your tray, lining up the edge of your duct tape to the place were the flat part of your tray and the wall match up and then working up and around the back edge. 
{five} continue with all four walls and you are done!


{what I LOVE about this tray}:
~ It wipes down easily without worrying that you are going to ruin it.
~ When you get bored of the zebra print you can remove all the duct tape and make a different try to match your next party {or better yet just cover over the duct tape}
~ It was EASY!
~ It didn't cost an arm and a leg {I think that may be my favorite part}


I am still throwing around the idea of adding a little monogram to it but I am not sure yet. The tray will be used for food, so the monogram will most likely end up covered up... Hmmmm.... What do you all think? Should I add the monogram or leave it as is?

Wednesday, August 17, 2011

{little girl} hair bow

Last week a friend called me up and asked if I would help her with a bow she wanted to make for her soon-to-be baby girl {it is one of the same friends that I celebrated with a few weeks back}. I had made a variation of the type of bow she was wanting to do, but not the exact type she was wanting to try. However, I am always up for something new, so I told her to come on over and we would try it out. The bows that we made were seriously the easiest bow ever!!!! EVER!!! {I can not emphasize this enough} E.V.E.R!

When she was over we made a sweet little headband for her baby to wear home from the hospital, as well as matching bows for her other little girl and for Soph. 

We made the three bows in about 30 minutes. And that was the first time we made them... love when things are easy and don't take me all day to make!

{What you need}
~ fabric {you can use any type you want... you can use anything from organza to burlap}
~ hot glue
~ alligator clip {or a headband, or really any type of clip you want}

{one} Cut circles of different sizes {small, medium, and large}. The size of circle depends on what you want your bow to look like. For the bow I made I cut 2" circles, 1 1/2" circles, and 1" circles. {I cut about 6 of each size of circle. You may not need that many, but it is nice to have lots of each size to choose from when you start glueing}

{two} Hot glue one of your 1" circles to the inside of your clip as a base {if you are using a headband, glue the circle to the underside of your headband}

{three} Take one of your large circles and fold in half, and then over once more. I like to fold mine not exactly in half. This makes the layers uneven and gives nice fullness. 

{four} Hot glue your folded circle to the clip at the center of your base circle. 

{five} Continue folding your large circles and glueing to the base till you have the base circle completely covered. 

{six} Fold your other circles in the same fashion. Glue them into place where needed to get the fullness you desire.

{variations} For the bow that I did, I took a few of my 1" circles and scalloped the edges before placing them in the middle. You could also add a couple of buttons or beads to the middle for something different {we added three white buttons to the headband and it was very cute... just wish I had taken pictures}


And just to remind you how d-a-r-l-i-n-g this bow is on top of a little head, I leave you with this...


Happy Bow-ing!

Monday, August 15, 2011

Reusable Grocery Bags

Starting October 15th, Portland will be banning the use of plastic bags at grocery stores. The hope is that it will help the environment and reduce the hazards that these bags cause on marine life. Those that passed the ban {and those in favor of it} also hope that it will be an incentive for shoppers to bring their own reusable bags to the store with them {the ban only keeps grocers from using plastic bags, paper bags are still available to customers}. 


James' Grandma's birthday is coming up, and as I was brainstorming ideas for what to do for her, this {soon-to-be} ban was brought to my attention. I figured making her some reusable produce and grocery bags would be such a great and practical gift since she lives in the city. 


I threw around the idea of using one of my reusable bags as a pattern, but I found a great pattern at JoAnn's that was cute and different, and decided that using that would be a better idea {and cause much less grief than going at it alone}. I used this See & Sew Butterick pattern. 


It really was very easy, just like the pattern says! The most difficult part was the bias tape. Am I the only one that can not, for the life of me, sew a straight line when I am sewing bias tape! OYE! To cover up my less than perfect seem, I used a decorative hem on my sewing machine... it turned out super cute and actually made me really happy that my first hem came out *ahem* less then straight. 


After I sewed the grocery bag, I decided to also make some cute produce bags but I was having a hard time deciding how I wanted them to look. I threw around the idea of making them out of mesh fabric, but I happened to find a yard of muslim in the remnant bin and decided to just do that instead.


Once I got home I just started cutting... seriously! I went into making the produce bags with NO IDEA how I wanted them to look or what size I wanted them to be. 


The first bag I cut ended up being about the same size as a standard plastic bag you get on the produce aisle. I did the embellishment BEFORE I sewed the bag together. To do the embellishment I cut a long strip of my leftover flower fabric and sewed up the middle using the longest stitch on my machine. Then to ruffle it I carefully pulled the bottom thread. Once I got the right amount of ruffle I pinned it down in a big letter P {the P is for his Grandma's last name, but it also could stand for produce, since that is what will go in there}. I sewed the P in place with my sewing machine {word to the wise... when sewing your ruffle into place the quicker you sew the better your ruffle will stay evenly ruffled. If you go to slow, the machines foot will push the ruffle out of your material}. Next I sewed up the side and the bottom right side out, and then put it inside out, pressed it, and sewed again {making a french seam}. Lastly, I sewed the top by making a little pocket for the cording by folding the top over twice and sewing close to the edge... you know what I mean, right? Then I added the cording by attaching the end to a safety pin and sliding it through the pocket. 


The second bag I made is a bread/baguette bag. This bag is actually the exact same size of fabric as the produce bag, except I folded the material the hotdog way versus the hamburger way. I also added the ruffle before sewing it together. I did the ruffle the same way as before, but instead did a little stripe of the flower fabric. 


These bags turned out so cute, that I was very tempted to keep them for myself and just bring his Grandma some flowers for her birthday!


The wrapping turned out to cute that I had to share as well. I folded and wrapped all three bags in tissue paper, and then cut two large rectangles a little bigger than the biggest wrapped bag. 


I sewed up three sides of the brown paper, put the three folded bags inside, and then sewed up the fourth side {be careful that your paper is big enough that when you sew up the final side, you don't accidentally sew into your gift}. 


Lastly, I made a cute bow out of the leftover scraps {I attached the bow to a hair clip and stuck the clip through the paper to get it to stay}. 


Then I made a card out of some leftover ruffle and card stock.  To finish the card off, I sewed a leaf pattern to hold the two pieces of card stock together, and attached the card to the gift with the bow!


I even made a bow for Soph's hair to match. This bow took about 10 minutes, from start to finish. And all that was required was a clip, hot glue and fabric... THAT'S IT!!!! 


Easy+adorable= winning combination! 


Check back Wednesday for a tutorial of how I made the bow for her hair!


I linked up to Someday Crafts... go check it out for even more inspiration!


Wednesday, August 10, 2011

How to: Build a Fort

Last week I made such a cute gift for a special little 3 year old. I have been chompin' at the bit {yep... I just said that} to show everyone because it turned out so cute, but I had to wait till after her birthday party on Saturday, because I know her momma is reading {hi Patti}. 

I was inspired by something that I found over on Saltwater Kids. It is a fort kit! How cute is that! I remember being a kid and trying to make forts, only to have them completely fall apart {flashback to books falling on my head and getting lost in a sea of old sheets}. 

It was so simple and fun to put together... I can't wait for Sophia to be old enough so I can make one for her too!

{Fort Kit} Supply List:
~ 2 twin sheets {or one king size sheet cut in half} 
~ Coordinating Pillow Case
~ Extra Piece of Material to Coordinate with the Pillow Case {optional}--- size depends on size of pillow case
~ Ribbon
~ Clothespins
~ Clamps
~ Suction Cups
~ Flashlight
~ Books
~ Deluxe Fort Tag
OPTIONAL ADDITIONS: Stuffed Animal {maybe a pillow pet}, Rope {this could be great for older kids.. but I did not think it would be a great addition to give to a three year old}, extra sheets... If you have any other ideas, leave me a comment, I would love to hear it!

The saltwater kids tutorial used an old adult sized t-shirt for the ties on the sheets. However, I had some coordinating ribbon that I used instead {remember, if you once you cut the ribbon to lightly singe the cut edges of your ribbon to keep it from unraveling}. 

To make the main bag, I just cut the bottom off of the pillowcase, and with coordinating fabric sewed a little base around the bottom. If you choose to do the two toned affect for your bag use the rule of thirds {bottom fabric should be 1/3 the length of the whole bag... approx.}--- yes I realize that this is the worst possible explanation of what I did, but to be honest I truly just winged it, and consequently took no measurements... I was super lucky it all worked. Next time I do this, I will take better notes and pass them on to you! Oooppppssss!


I used the Saltwater Kids Tutorial exactly as they wrote it to create the sheets {only difference is I cut 1 King size sheet in half to create two, matching twin sized sheets and I also used ribbon instead of a t-shirt for the ties}. 

I also made an accessory bag out of the coordinating fabric {to hold the clothespins, clamps, and suction cups}. I took some fabric {approx. 12X24 inches}, folded the material in half {right side in} and sewed up the sides, then I sewed a little pocket at the top and threaded some ribbon through the pocket to create a drawstring. 
Lastly, I put everything into the bag and added a little tag. FINISHED!


I really liked the tag that Saltwater Kids had created but the colors did not match the bag I made. So I re-created their tag in illustrator and indesign with colors that coordinated with my bag. 


Wednesday, August 3, 2011

Baby Shower- Garden Party {pink & brown}

Over the weekend I went to such a beautiful baby shower thrown for a friend that I have known since I was little girl. I was asked to do the invitations for the shower, which was fun to do!


I didn't help much more than the invites and a few other printables, but the shower was so beautiful {and completely DIY} that I could not help but show you a few of my favorite shots of the decorations. 
 The shower was held at one of the hostesses home. She has a beautiful pool and backyard, so many of the tables were set up poolside. It was magical... as in she should not be surprised if she goes out to her yard one morning to find me back there sipping coffee and reading a magazine. It felt like I was on a vacation being back there...


Keeping with the "garden" theme, there were vases of flowers everywhere. They were GORGEOUS {and arranged by the hostesses}


One of my favorite uses of floral decor were these huge apothecary jars that had long stems of flowers inside. So simple, yet so chic!


The food was equally as beautiful as the decor. I am a firm believer that you can have the most stunning decorations but if your food table is just thrown together, you may as well pack it all up and go home! All the food was made by the hostesses and they looked and tasted great. One the menu was: {mini} quiche lorraine, {mini} cinnamon rolls, {mini} bran muffins, fruit kabobs, coffee, sparkling pink lemonade, and cake {the cake was the only thing that was store bought}. Did you see a theme among the food? I love me some food that it in tiny little sizes!
 The mommy-to-be made the most adorable cookies in the shape of baby carriages as a little thank you to her guests. Such a kind gesture. However, I may be a little jealous of her skills... I can't even frost a cupcake.